DIY Portable Power Station for Camping: Build Your Own 12V Power Box

Commercial “solar generators” and portable power stations are everywhere now—but if you enjoy tinkering, you can build a DIY portable power station that’s better suited to your own camping style. A custom 12V power box can run your fridge, charge phones and cameras, and power camp lights, all while integrating neatly with your vehicle or solar panels.
In this guide, we’ll design a robust power box ideal for camping in Australia, focusing on safety, practicality, and expandability rather than flashy marketing.

What a DIY Portable Power Station Can Do
A well‑built 12V power station can:
- Run a 12V fridge for days when paired with appropriate batteries and solar.
- Power LED camp lights without touching your vehicle battery.
- Charge phones, tablets, laptops, cameras, and radios.
- Provide Anderson, cigarette lighter, and USB outputs for flexibility.
For many campers and 4WD tourers, this becomes the heart of their off‑grid setup—especially in national parks and remote campsites across Australia.
Choosing the Right Battery Chemistry
The battery is the heaviest and most expensive component, so choose wisely.
AGM (Lead-Acid)
- Affordable and widely available.
- Heavier and bulkier for the usable capacity.
- Can typically use around 50% of rated capacity regularly.
Lithium (LiFePO₄)
- Higher upfront cost but much lighter and more compact.
- Can safely use 80–90% of rated capacity.
- Excellent cycle life—ideal for frequent camping and touring.
For a modern, travel‑friendly power station, LiFePO₄ has become the go‑to choice for many Australian travellers.
Core Components for a DIY 12V Power Box
At a minimum, you’ll need:
- Battery (AGM or LiFePO₄, e.g., 50–120Ah).
- Battery box or enclosure with room for sockets and wiring.
- Fuse block or distribution panel.
- 12V outputs: Anderson plugs, cigarette sockets, USB‑C/USB‑A ports.
- Voltmeter or battery monitor.
- Main fuse close to the battery positive terminal.
Optional but highly recommended:
- DC‑DC charger for charging from the vehicle alternator.
- Solar regulator (MPPT) to accept folding or rooftop solar panels.
- AC charger for plugging into mains power at home or caravan parks.
Designing Safe Wiring and Protection
Safety is non‑negotiable when working with high‑current 12V systems.
- Size cables according to maximum expected current on each circuit.
- Install a main fuse as close to the battery as possible.
- Use individual fuses or resettable breakers for each output circuit.
- Label circuits clearly so troubleshooting is easier at the campsite.
Good crimping practices, heatshrink, and cable management go a long way to preventing shorts or loose connections on corrugated roads.
Example Layout for a Camping Power Station
Picture a medium‑sized battery box with:
- Front panel:
- Two Anderson outputs (for fridge and external loads).
- One or two 12V cigarette sockets.
- Dual USB‑A/USB‑C ports.
- Digital voltmeter or battery state‑of‑charge display.
- Side panel:
- Anderson input for solar.
- Anderson input from the vehicle’s DC‑DC charger.
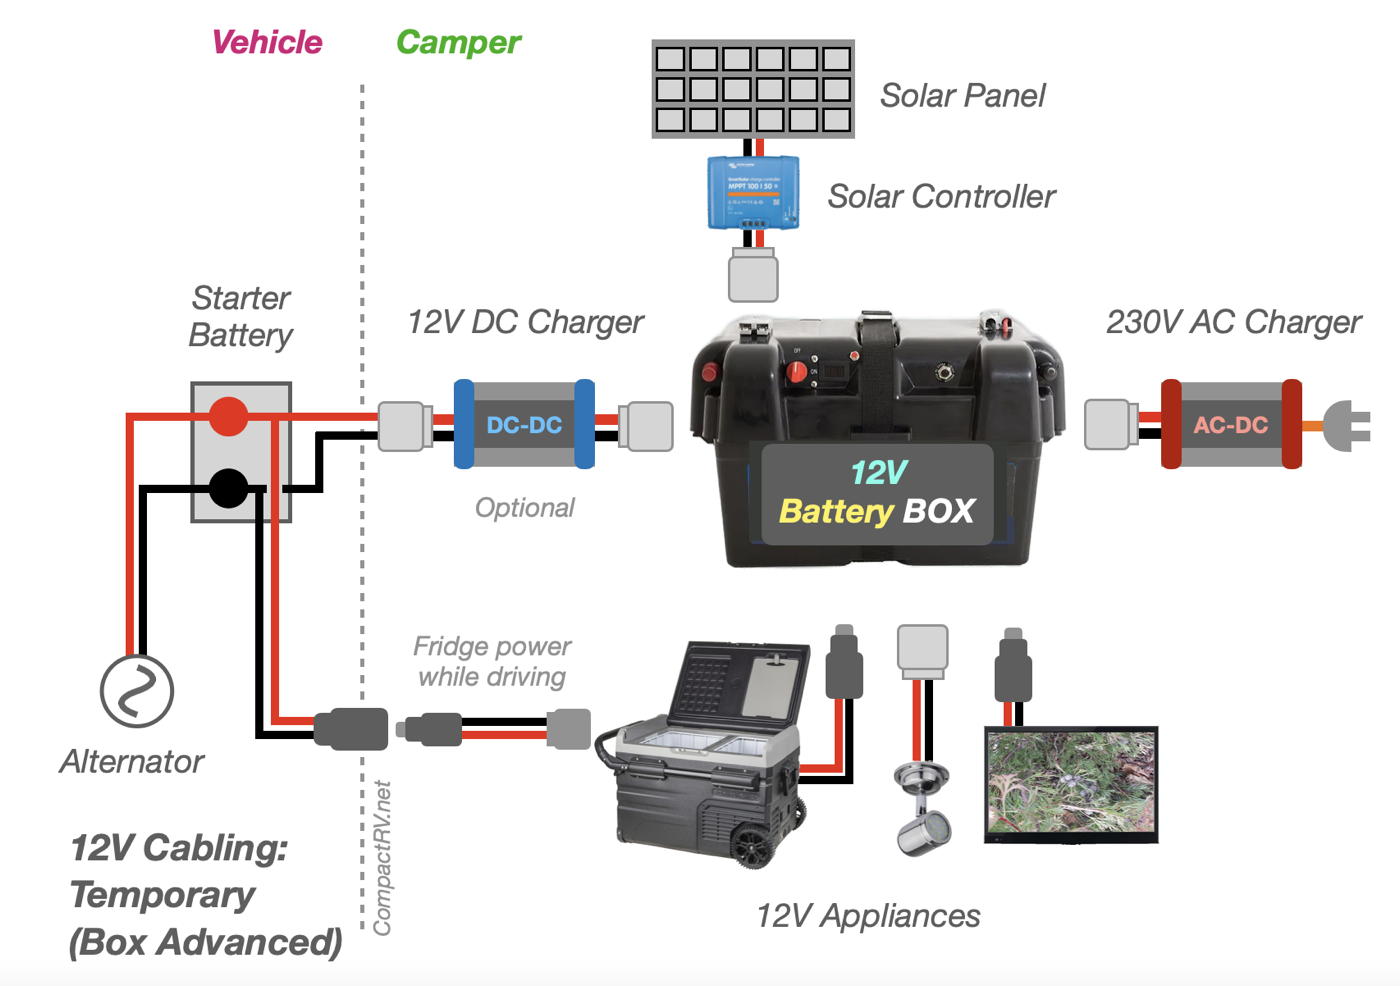
Inside the box:
- Battery mounted securely with foam or brackets.
- Fuse block mounted to an internal panel.
- Cables routed cleanly with cable ties and protective conduit where needed.
Charging Your DIY Portable Power Station
For flexible adventures, you’ll want multiple charging options:
1. From Your Vehicle
- Run an Anderson‑terminated cable from your DC‑DC charger in the vehicle to the power box.
- The DC‑DC charger ensures correct charging for AGM or lithium batteries and protects your starting battery.
2. From Solar
- Use a folding solar panel or blanket with an appropriate MPPT regulator.
- Connect via a dedicated Anderson solar input.
- Adjust panel angle and position to chase the sun at camp.
3. From Mains Power
- At home or on powered sites, plug in an AC charger designed for your battery type.
- Top off the battery before trips to maximise runtime once off‑grid.
Estimating Runtime for Camping Loads
To avoid surprises, estimate how long your DIY power station can run your gear.
Example with a 100Ah LiFePO₄ battery:
- 12V fridge averaging 3A over 24 hours → 72Ah/day.
- Lights and phone charging → ~10Ah/day.
Total ≈ 82Ah/day usable. With around 90Ah of usable capacity, you have roughly one full day without any charging—more with solar input or reduced fridge load overnight.
DIY Portable Power Station Checklist
- Choose battery capacity and chemistry (AGM vs LiFePO₄).
- Select a suitable battery box or custom enclosure.
- Plan outputs: Anderson, cigarette, USB, and any extras.
- Design wiring with correct cable sizes, fuses, and switches.
- Integrate DC‑DC, solar, and mains charging options as needed.
- Test all loads at home before heading to a remote campsite.
With some thoughtful planning and careful wiring, your DIY portable power station will become an essential part of every camping trip—keeping fridges cold, lights bright, and devices charged whether you’re on a quick weekend getaway or a month‑long outback adventure.